Renaming The Recycle Bin icon:

Posted by Ashish | 2:43 AM

To change the name of the Recycle Bin desktop icon, click Start then goto Run, write Regedit and press Enter. It opens Registry Editor. Now in Registry Editor go to:

HKEY_CLASSES_ROOT/CLSID/{645FF040-5081-101B-9F08-00AA002F954E}

On the right pane, locate the registry key of Localized String.

Double click on LocalizedString or right click on LocalizedString and select Modify to modify the registry value.

You should see the default value of “@%SystemRoot%\system32\SHELL32.dll,-8964″. Delete or remove the default value and key in your desired new recycle bin’s name in text, e.g. “Garbage Bin” (without quote).

Refresh your desktop or Windows Explorer by pressing F5. You will see the new ‘recycle bin’ name.

Optionally, you can also modify the text of InfoTip, commonly known as tooltip what display certain help tip, guide or description about Recycle Bin when the mouse is hovering on Recycle Bin icon on desktop. The default text is “Contains files and folders that you have deleted.” Simply double click on InfoTip, or right click on InfoTip and select Modify to change the text of the info tip.

The default value is “@%SystemRoot%\system32\SHELL32.dll,-22915″, simply change it to another description that you want the tooltip to be.

Refresh the desktop to make it effective.
Whenever you shut down your computer, it takes a lot of time in closing all the running applications.And worse, if they stop responding, then you have to click either end task or wait for windows to shut it down. Now you can apply a registry hack that automatically shuts the non-responding annoying applications instantly and without any interruption. Apply the following registry hack to speed up windows xp.

1. Open registry editor from Start -> Run -> type regedit
2. Find HKEY_CURRENT_USER\Control Panel\Desktop
on the left side of the registry editor window.
3. Double click on AutoEndTasks key from the right window and assign the value to be 1. The default value is 0.

Reverting the process is also very simple. Just change the AutoEndTasks value to 0.

Trouble:
Are you among those who are not able to access or see your folder options under File
Menu>>Tools in Windows Explorer on your Windows XP ? This problem of hidden or
disabled folder options occur normally due to malicious virus (w32.rontokbro@mm)
activity.
The virus creates an entry in registry to disable “Folder Options” in Windows explorer.
Let us see how we can fix it.

Fix:
In most of the cases, even if the virus is been already removed by your anti-virus
program, it doesn’t restore the registry back to the original state. Also anti-virus usually
does not delete the registry entry created by the virus.
For restoring the registry settings,follow the steps given below
Enable your folder options in explorer.
1. Go to Start > RUN
2. Type regedit and press enter.
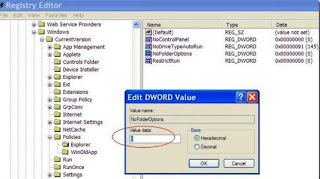
3. Go to HKEY_CURRENT_USER > Software > Microsoft > Windows >
CurrentVersion > Policies > Explorer


4.On the right side of the screen, you can see some registry entry names, out of them,
right-click on NoFolderOptions and click Modify option.
5.A new small screen pops up, on this screen, sen the value data field as 0 (zero).Press
OK.
That’s it but it requires reboot. Trouble Fixed.

To convert a FAT partition to NTFS, perform the following steps.
Click Start, click Programs, and then click Command Prompt.
In Windows XP, click Start, click Run, type cmd and then click OK.
At the command prompt, type CONVERT [driveletter]: /FS:NTFS.
Convert.exe will attempt to convert the partition to NTFS.


NOTE: Although the chance of corruption or data loss during the conversion from FAT to NTFS
is minimal, it is best to perform a full backup of the data on the drive that it is to be converted
prior to executing the convert command. It is also recommended to verify the integrity of the
backup before proceeding, as well as to run RDISK and update the emergency repair disk
(ERD).

To speed up the browsing of your local LAN try this:
1.Open the registry editor.
2.Go to
HKEY_LOCAL_MACHINE\Software\Microsoft\Windows\CurrentVersion\Explorer\RemoteComput
er\NameSpace

3.Export this key (in order to back it up, just in case) and then delete the key called
{D6277990-4C6A-11CF-8D87-00AA0060F5BF} (Task Scheduler).

4.Close the registry.
Be sure to check your 'Binding Order' in Network Connections > Advanced.
Make sure you're logged on as actually "Administrator". Do not log on with any account that
just has administrator privileges.
1.Start > Run > type gpedit.msc (not available in home version).
2.Expand the Local Computer Policy branch.
3.Expand the Administrative Templates branch.
4.Expand the Network branch.
5.Highlight the "QoS Packet Scheduler" in left window.
6.In right window double click the "limit reservable bandwidth" setting.
7.On setting tab check the ENABLED item.
8.Where it says "Bandwidth limit %" change it to read 0 (ZERO).
9.Close gpedit.msc.
Effect is immediate on some systems, some need to re-boot.